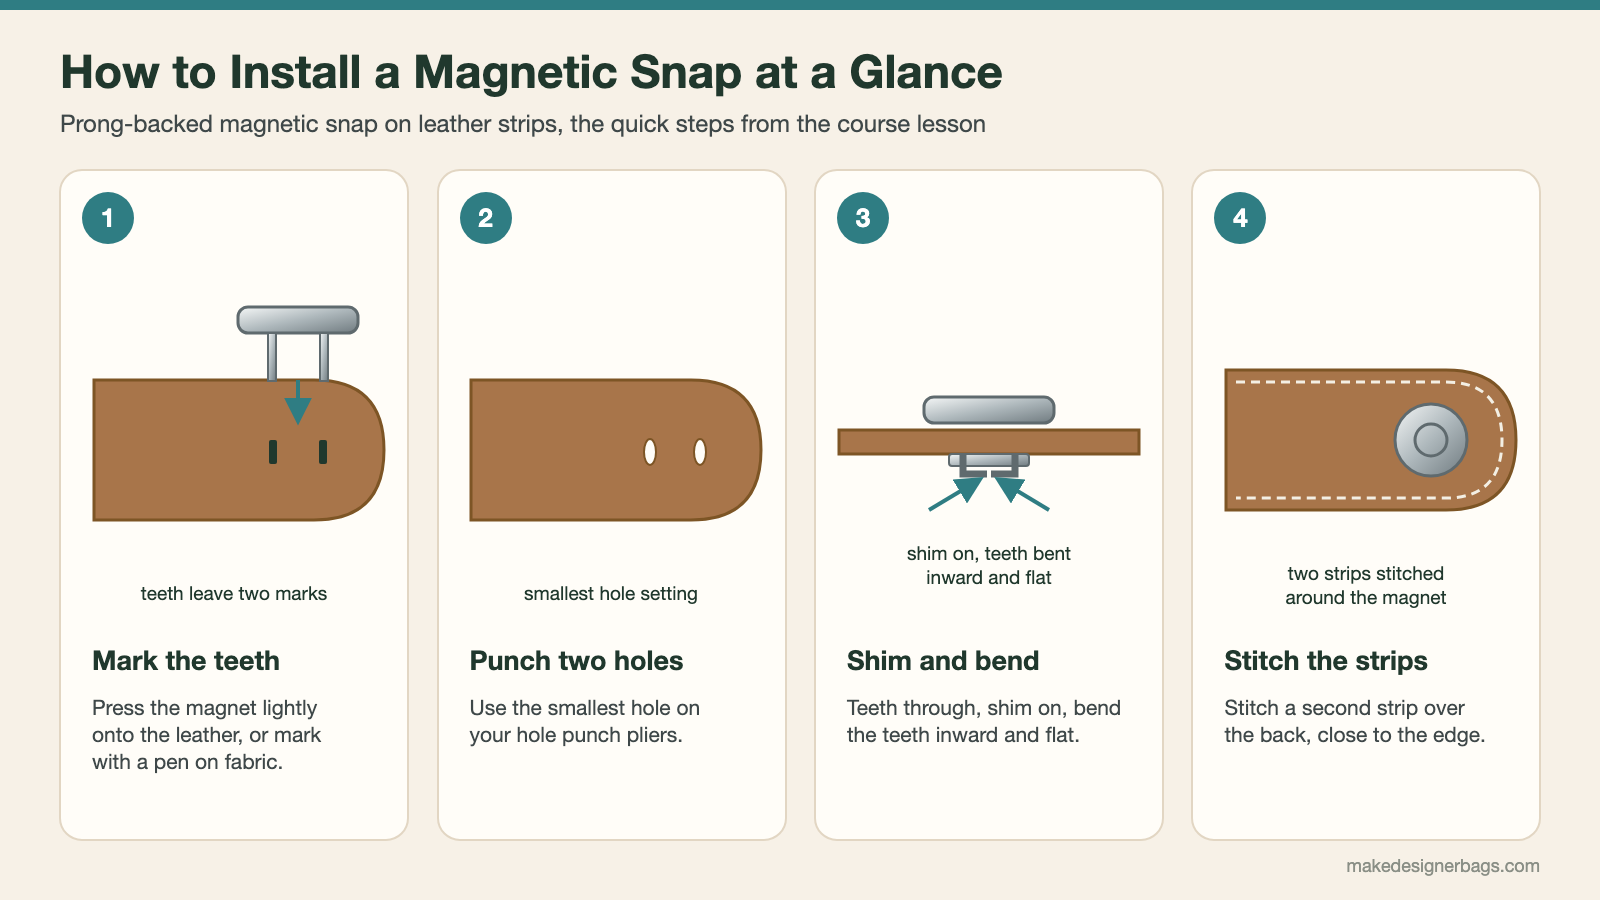
To install a magnetic snap closure, mark where the two teeth of the magnet go, punch two small holes, push the teeth through and put the shim over them on the back. Bend the teeth inward and flat, then stitch a second strip over the back so the magnet is enclosed. Make the counterpart the same way, lining it up with the first half, and sew both halves into the bag.
Magnetic Snap at a Glance
| Step | What you do | Why it matters |
|---|---|---|
| 1 | Press the magnet onto the strip to mark the teeth | The holes end up exactly where the teeth are |
| 2 | Punch two holes on the smallest setting | The teeth fit snugly without tearing the material |
| 3 | Teeth through, shim on, bend inward and flat | The magnet sits firmly and does not catch |
| 4 | Stitch a second strip over the back | Reinforces the magnet and hides the teeth |
| 5 | Repeat for the counterpart, lined up | The closure meets properly |
A magnetic snap is a quick, clean closure for a handbag. In the course it is set into strips of leather, synthetic leather or fabric first, and the finished strips are then sewn into the bag.
What You Need
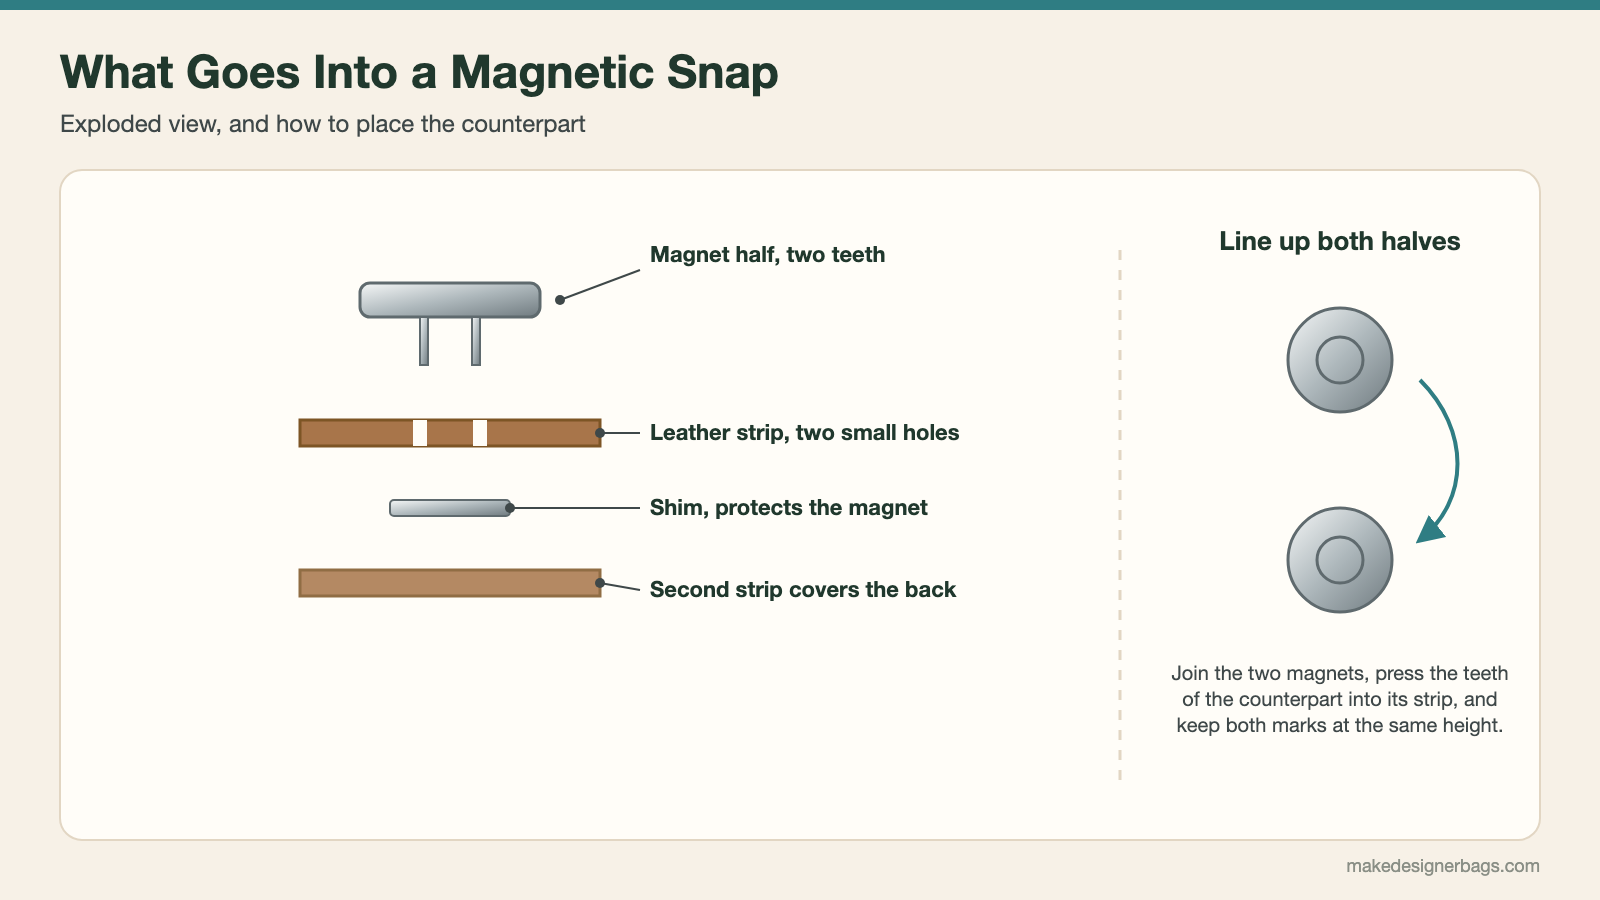
A magnetic snap closure, both halves, with their shims
Strips of leather, synthetic leather or fabric
A ballpoint pen for marking on fabric
Hole punch pliers set to the smallest hole
A hammer and a soft pad so the magnet does not get scratched
Wonder clips and a sewing machine with a longer stitch
Step by Step
Mark the Teeth
Decide where the magnet should sit on the strip. On leather or synthetic leather, press the magnet lightly onto the strip and the two teeth leave marks. On fabric, mark the position of the teeth with a ballpoint pen.
Punch the Holes
Set your hole punch pliers to the smallest hole and punch a hole at each mark. Do not cut the holes in synthetic leather with scissors; the hole could tear out.
Insert, Shim and Bend
Push the teeth through the holes from the right side. Put a pad underneath so the magnet does not get scratched. Place the shim over the teeth on the back and bend the teeth inward, toward the center. If they are too hard to bend with your fingers, press them flat with a hammer.
Stitch the Strips Together
Clip a second strip over the back of the first one and topstitch close to the edge all around with a longer stitch. On curves, stop with the needle down, lift the presser foot, turn a little and carry on. Then trim the edge neatly. With genuine leather, glue the two strips together before you topstitch. With fabric, the edges have to be turned under because fabric frays.
Make the Counterpart
Join the two magnets, then press the teeth of the counterpart onto its strip so they leave marks at the same height. If the imprint is slightly slanted, correct the marking so everything is straight. Punch, insert, shim and bend exactly as before, then stitch on the backing strip.
Sew It Into the Bag
The finished closure can sit between the lining and the outer panel at the top of the bag, instead of a zipper. On a bag with a flap, one half goes under the flap and the counterpart on the bag front. Measure carefully where the counterpart has to sit so the two halves meet.
Reinforce the back of the magnet with leather strips before attaching it to your bag, so the closure stays secure and does not strain the material.
Common Mistakes
Without the shim under the teeth, the teeth can scratch or damage the magnet and it will not sit firmly.
If the second half is not lined up with the first, the closure will not meet properly.
Teeth that are not bent flat enough make the magnet catch or feel bulky.
Not sure whether a magnet is the right closure for your bag? Hardware choices shape how a bag looks; read what makes your handmade bag look elegant and luxurious.
See It on Video
Installing a magnetic closure is shown step by step in close-up video in the Bag Sewing Fundamentals course. See the bag making courses.
Frequently Asked Questions
How do you install a magnetic snap without special tools?
You need hole punch pliers for two small holes, the shim that comes with the snap and a hammer to press the teeth flat. A soft pad underneath keeps the magnet from getting scratched.
What is the shim on a magnetic snap for?
The shim goes over the teeth on the back. It holds the magnet firmly and protects it when you bend the teeth flat.
How do I line up both halves of a magnetic snap?
Join the two magnets, then press the teeth of the counterpart onto its strip so the marks sit at the same height. Correct the marking if it is slanted.
Can I put a magnetic snap on fabric?
Yes. Mark the teeth with a pen instead of pressing them in, and turn the fabric edges under when you stitch the strips, because fabric frays.